Vagrant

Vagrant で 別の仮想マシンが立ち上がった場合の修正方法

vagrant upしたら突如、新規の仮想マシンがインストールされてまっさらな状態になってしまい、仮想マシンを作りなおそうかと思ったのですが、解決方法が有りました。

vagrant up で立ち上がる仮想マシンの確認

idに仮想マシンのidが書いてある。

[VAGRANT_HOME]/.vagrant/machines/default/virtualbox/id

VirtualBoxの仮想マシンの確認

{}で囲まれた部分にidが書いてある。

$ VBoxManage list vms
"aaa_default_1415254938" {d861c386-21d2-4728-881d-293f71d24630}
"bbb_default_1416555723" {fe5a7078-bd38-4138-a48b-6fce2b32cf0c}

立ち上げたい仮想マシンのidを、vagrantのidに上書きして、vagrant upすれば無事、立ち上がりました。

Vagrant で VirtualBox のメモリ数を指定する

データ量の多いサイトだとパフォーマンスが悪くて、仕方がないので、
メモリ数を増やす。

変更前

デフォルトだと、589M割り当てられている。

[vagrant@vagrant-centos65 ~]$ free -m
             total       used       free     shared    buffers     cached
Mem:           589        545         44          0          5         41
-/+ buffers/cache:        497         91
Swap:         1224          7       1217

Vagrantfileにメモリ数を指定

  config.vm.provider "virtualbox" do |vb|
  #   # Display the VirtualBox GUI when booting the machine
  #   vb.gui = true
  #
  #   # Customize the amount of memory on the VM:
     vb.memory = "2048"
  end

変更後

[vagrant@vagrant-centos65 ~]$ free -m
             total       used       free     shared    buffers     cached
Mem:          1877       1194        682          0          9        547
-/+ buffers/cache:        637       1240
Swap:         1224          0       1224

誤差があるが、あとで調べてみよう。

ついでにMySQLのバッファサイズも増やす

[mysqld]

innodb_buffer_pool_size=1024M
innodb_log_file_size=128M

CentOS が UNEXPECTED INCONSISTENCY で起動しない

Postgresにdumpをリストアしていたら途中でリストアに失敗して、CentOS再起動したらUNEXPECTED INCONSISTENCY;で起動しなくなりました。

/dev/VolGroup00/LogVol00: UNEXPECTED INCONSISTENCY; RUN fsck MANUALLY.
        (i.e., without -a or -p options )
                                                           [FAILED]

*** An error occurred during the file system check.
*** Dropping you to a shell; the system will reboot
*** when you leave the shell.
Give root password for maintenance
(or type Control-D for normal startup):

centos59_64_default_1390292917__Running_

rootでログインして、fsckを実行しろと表示されるので実行。

# fsck  -t  ext3  /dev/VolGroup00/LogVol00

centos59_64_default_1390292917__Running_2

修復はすぐ終わり、起動時にエラーは出なくなりました。

vagrant up でエラーが出るときに確認すること

デバッグログを出力して起動する

$ env VAGRANT_LOG=debug vagrant up

VirtualBoxのコンソールを出力して起動する

$ vi Vagrantfile

config.vm.provider :virtualbox do |vb|
  # Don't boot with headless mode
  vb.gui = true
...
end

今回起動しなかった原因

Vagrantfileのsynced_folderのパーミッションを変えて再起動したら、下記のエラーがでて起動しなくなった。

    Timed out while waiting for the machine to boot. This means that
    Vagrant was unable to communicate with the guest machine within
    the configured ("config.vm.boot_timeout" value) time period. This can
    mean a number of things.

    If you're using a custom box, make sure that networking is properly
    working and you're able to connect to the machine. It is a common
    problem that networking isn't setup properly in these boxes.
    Verify that authentication configurations are also setup properly,
    as well.

    If the box appears to be booting properly, you may want to increase
    the timeout ("config.vm.boot_timeout") value.

timeoutの設定変更したりしたが、起動せず。
GUIモードで、VirtualBoxのコンソール出力して起動したら、起動時にエラーが出ている。

/dev/VolGroup00/LogVol00: UNEXPECTED INCONSISTENCY; RUN fsck MANUALLY.
(i.e., without -a or -p options )
[FAILED]
*** An error occurred during the file system check.
*** Dropping you to a shell; the system will reboot
*** when you leave the shell.
Give root password for maintenance
(or type Control-D for normal startup):

fsckコマンドで修復する必要があるので、コマンドを調べて実行したら無事vagrantからも起動出来ました。

fsck -t ext3 /dev/VolGroup00/LogVol00

Vagrantのsaharaプラグインを使ってみる

Vagrantにはsaharaという、VMの状態をロールバックしたりできるプラグインがあります。
下記に、詳しく書いてあります。

saharaでVagrantの状態管理 – Qiita [キータ].

使ってみる

インストールは、vagrantコマンドでインストールしました。

$ vagrant plugin install sahara
$ vagrant plugin list

確認

$ vagrant plugin list
sahara (0.0.15)

saharaプラグインをインストールするとVirtualBoxに別のイメージが作られて、そこを使って状態を管理するようです。

Oracle_VM_VirtualBox_マネージャー-3-4

Vagrantで構築したCentOSで開発する メール送信テスト環境設定

メール送信のテストする為の環境構築した際にてこずったので、同じミスをしないようにブログに投稿します。

Vagrantについては、昨日書いたエントリーの通りとなります。

suusuke – blog – Vagrantで構築したCentOSで開発する.

目次

  1. Postfixインストール・設定
  2. Dovecotインストール・設定
  3. Hostから送受信テスト

Postfixインストール・設定

Postfixをインストールして、設定ファイルを変更します。
開発環境なので、メールが送れているかチェックしたいだけなので、全てのドメイン宛のメールをローカルの配送する用に設定します。

$ yum -y install postfix
$ cp /etc/postfix/{main.cf,main.cf.org}
$ vi /etc/postfix/main.cf

# 全てのメールを受け取る
inet_interfaces = all

# ローカル配送で不明なユーザを拒否しない
local_recipient_maps =

# Maildir形式として保存するディレクトリを /usr/local/mail/ の下にユーザー毎に作成する
mail_spool_directory = /usr/local/mail/

# ローカル配送で不明なユーザへのメールは maildev へ送る
luser_relay = maildev

# トランスポートマップを指定
transport_maps = hash:/etc/postfix/transport

トランスポートマップの設定

$ vi /etc/postfix/transport

# 全てローカルに配送
*       local:
$ postmap /etc/postfix/transport

設定反映

$ /sbin/service postfix reload

Maildirの場所ですが、通常であれば、~/Maildir/となるのですが、/home/ディレクトリをホストにマウントしており、何度メールを送ってもnot permittedになってしまい、配送に失敗していたため、変更しました。
ただ、Vagrantfileでマウントの設定でユーザーは root パーミッションは 777 にしているつもりなのですが、ここは今後の課題ですね。

Nov 30 19:50:20 localhost postfix/local[5922]: 7D5656F026C: to=<maildev@mail.vagrant-centos59_64.localdomain>, relay=loc
al, delay=0.17, delays=0.14/0/0/0.03, dsn=5.2.0, status=bounced (maildir delivery failed: create maildir file /home/mail
dev/Maildir/new/1385808620.V15I7c25M679327.vagrant-centos59_64: Operation not permitted)

配送先ユーザーmaildevは予め追加しておきます。

$ useradd maildev
$ passwd maildev

元々、sendmailもpostfix入っていないサーバーだったので、mtaの変更は必要ないですが、一応確認だけします。

$ /usr/sbin/alternatives --config mta

1 プログラムがあり 'mta' を提供します。

  選択       コマンド
-----------------------------------------------
*+ 1           /usr/sbin/sendmail.postfix

Enter を押して現在の選択 [+] を保持するか、選択番号を入力します:

Dovecotインストール・設定

Dovecotをインストールし、設定します。
各プロトコルを使えるようにと、PostfixでMaildirのパスを変更しているのでそこを設定します。

$ yum -y install dovecot
$ cp /etc/{dovecot.conf,dovecot.conf.org}

protocols = imap imaps pop3 pop3s
mail_location = maildir:/usr/local/mail/%u

Dovecotは、本番環境に合わせて、1系をyumでそのままインストールしました。

Hostから受信テスト

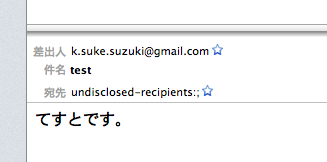
telnetコマンドでメールを送ります。

$ telnet localhost 25
Trying 127.0.0.1...
Connected to localhost.
Escape character is '^]'.
220 mail.vagrant-centos59_64.localdomain ESMTP Postfix
helo localhost
250 mail.vagrant-centos59_64.localdomain
mail from: k.suke.suzuki@gmail.com
250 2.1.0 Ok
rcpt to: test@test.com
250 2.1.5 Ok
data
354 End data with <CR><LF>.<CR><LF>
subject: test
てすとです。
.
250 2.0.0 Ok: queued as 6E27E6F026E
quit
221 2.0.0 Bye
Connection closed by foreign host.

HostにThunderbirdをインストール、アカウントを設定して受信確認できればOKです。
受信トレイ

参考サイト

全てのドメイン宛のメールを受信する – ngの日記.

追記1

Mailcatcher for Drupal and other PHP-applications – The simple version.

vagrant mail で検索してたら、MailCatcherという、ruby製のSMTPサーバーが有ることを知りました。
これを使うと、メールを送信した内容がWEBブラウザで簡単に確認できるようになるようです。
PHPの場合は、php.inisendmail_pathを変更するだけで使えるようになるようです。
※未検証

追記2

試してないけど、synced_folderの書き込めない件は、Vagrantfileの設定のグループを変更するれば出来そう。もしくは、dmode(ディレクトリのパーミッション?)は777になってましたが、fmode(ファイルのパーミッション?)が666なのでそこを変えても出来そうです。
※未検証

Vagrantで構築したCentOSで開発する

Vagrantで開発を始めて、ある程度知識も溜まってきたので備忘録代わりにブログに書きたいと思います。

環境

HOST Max OS X Lion
GEST CentOS 5.9(64bit)
Vagrant 1.3.5
Virtual Box 4.3.0

目次

  1. VirtualBox のインストール
  2. Vagrant1.3 のインストール
  3. box ファイルのインストール
  4. Vagrantfile の作成
  5. 仮想サーバを構築

Virtual Box のインストール

Downloads – Oracle VM VirtualBox.

上記からダウンロード、インストール。インストール時最新は、4.3.0。

Vagrant1.3 のインストール

Vagrant – Downloads.

上記からダウンロード、インストール。Rubyのgemコマンドでもインストールできるようです。インストール時最新は、1.3.5。

box ファイルのインストール

A list of base boxes for Vagrant – Vagrantbox.es.

イメージファイルを一から作るのは大変ですので、上記、Vagrantbox.esサイトからboxファイルを探して、インストールする方法が一番手軽です。ただ、他人が作ったイメージファイルなので、セキュリティがどうとかっていう事を聞いたことが有るので、そこは自己責任ですね。
会社のサーバーが古いのでそれに合わせて、イメージファイルを探して、インストールしました。

$ vagrant box add centos59_64 http://tag1consulting.com/files/centos-5.9-x86-64-minimal.box

Vagrantfile の作成

Vagrantfileはvagrantの設定ファイルになります。
$HOMEの下にvagrantというディレクトリと今回のサーバー用のディレクトリ(centos59_64)を作成して、その下で管理しています。

$ mkdir ~/vagrant
$ cd ~/vagrant
$ mkdir centos59_64
$ cd centos59_64

Vagrantfilevagrant initコマンドで作成し、変更していきます。

$ vagrant init
$ vi Vagrantfile

ちなみに、変更後のVagrantfileは以下の通りです。

VAGRANTFILE_API_VERSION = "2"

Vagrant.configure(VAGRANTFILE_API_VERSION) do |config|

  config.vm.box = "centos59_64"
  config.vm.network :private_network, ip: "192.168.33.10"

  config.vm.synced_folder "/Users/suusuke/vagrant/centos59_64/home/", "/home/", \
        create: true, owner: 'root', group: 'root', \
        mount_options: ['dmode=777,fmode=666']

   config.vm.provider :virtualbox do |vb|
     #vb.gui = true
  
     # Use VBoxManage to customize the VM. For example to change memory:
     vb.customize ["modifyvm", :id, "--memory", "1024"]
   end
end

Vagrantのプロ?は、ここでchefやshellを使って、プロビジョニングしていくようですが、まだそこまで出来ないので、最低限の設定を書いています。
一つだけポイントとして、vagrantにはsynced_folderという機能があり、仮想サーバーのディレクトリを、ホストにマウントすることができます。今回は、Vagrantfileのあるディレクトリに、homeディレクトリをマウントさせています。これは、WEBサイトを作成する際に、ApacheのVirtualHostで各ユーザーディレクトリの下を公開ディレクトリにして開発する為です。

仮想サーバーを構築

vagrant upコマンドで、仮想サーバーを立ち上げます。

$ vagrant up

あとは、sshでサーバーにログインして、環境を作成していきます。

$ root@192.168.33.10

Apache、PHP、MySQL、PostgreSQL、Postfix、Dovecot 等をインストールして、それぞれ設定しホストPCでホストの設定をすればWEBの開発環境の完成です。

$ vi /etc/hosts
192.168.33.10  vagrant.localhost
192.168.33.10  test.example.com
....

実際にプログラムは、synced_folderのお陰で、ホストPCで変更したものが即座に反映されます。
僕は、Eclipseを普段使っているので、workspaceを~/vagrang/centos59_64/homeにして、開発をしています。

あと、WEBプログラムでメールのテストの為に、PostfixとDevcotで設定したのですが、逆にsynced_folderの機能のせいで、半日くらいうまく行かなくて時間を使ってしまったので、そちらは後ほど書き留めたいと思います。

参考サイト

Vagrant で自分の PC に「作って、壊して、元に戻せる」サーバを作る – Shin x blog.